
Essential Flooring Accessories and Tools for Installing Floating Hybrid Flooring
- Imperial Flooring Australia
- 11 minutes ago
- 3 min read
Are you considering upgrading your home’s flooring? Installing new flooring can transform a space, and floating hybrid flooring is increasingly popular for good reasons. It is durable, easy to install, and visually appealing. To achieve a professional finish, having the right accessories and tools is critical. In this post, we will outline the essential flooring accessories and tools you need for a successful floating hybrid flooring installation.
Understanding Floating Hybrid Flooring
Floating hybrid flooring is a blend of laminate and vinyl, which offers a robust, waterproof surface that is ideal for kitchens, bathrooms, and living areas. Unlike traditional flooring, floating hybrid planks do not require glue or nails. They simply interlock, making them perfect for DIY enthusiasts.
Before we look at the tools and accessories, let's understand the components involved. Floating hybrid flooring typically consists of a core made from high-density fiberboard and a protective wear layer on top, making it resistant to scratches and stains.
Necessary Accessories
Finishing Transtion Trims
Selecting the appropriate transition type is the foundation of achieving a seamless transition. Whether you opt for C channel trim, L angle trim, Scotia or Flush-mount transitions, make sure it complements the flooring materials and blends harmoniously with the existing decor.
C Channel Trims: All round trim that can be used in all transition areas like entry door ways, sliding doors, bedroom cupboards and floor to carpet transitions.
L Angle Trims: Suitable for transition areas that are flush to the new floor height or higher, the L Angle trim is glued to the transition, not to be glued to the floor
Scotia Beadings: Suitable for perimeter skirting boards or joinery (kitchen) to finish off the expansion gap
Skirting boards or Scotia
Once you finish installing your flooring, adding skirtings or scotia molding completes the aesthetic while concealing the expansion gaps. These pieces not only improve the visual appeal but also protect your flooring edges from damage.
Essential Tools for Installation
Tape Measure
An accurate tape measure is fundamental for gauging the area where you'll install flooring. Correct measurements are crucial for cutting planks accurately, helping to reduce waste significantly.
DIY Floor Laying Kit
At Imperial Flooring Australia, we ensure that buying your flooring package is both enjoyable and straightforward. Our DIY floor laying kit comes with Wedges, a Tapping Block, and a Pull Bar to meet all your essential laying needs.
Floor Knee Pads
Floor Laying Knee Pads are a must-have for any flooring install, protect your knees for the hardwork at hand
Flooring Pull Bar
A flooring pull bar helps you tap and snug the planks together without damage. This tool ensures that panels fit tightly along walls and edges, providing a clean and professional appearance.
Tapping Block
Using a tapping block allows you to connect flooring pieces smoothly while protecting the edges of the planks. It enables gentle tapping without risking damage to the flooring material.
Hammer or Mallet
A rubber mallet is essential when using the tapping block. It helps secure flooring pieces together while minimizing the risk of chipping or damaging the planks. Opt for a rubber mallet to maintain the quality of your flooring.
Leveling Tool
Before installation begins, use a leveling tool like a straight edge or a laser level to ensure your subfloor is even. An uneven surface can lead to issues like buckling or warping. Ideally, your subfloor should be 3mm over a 3metre span flat.
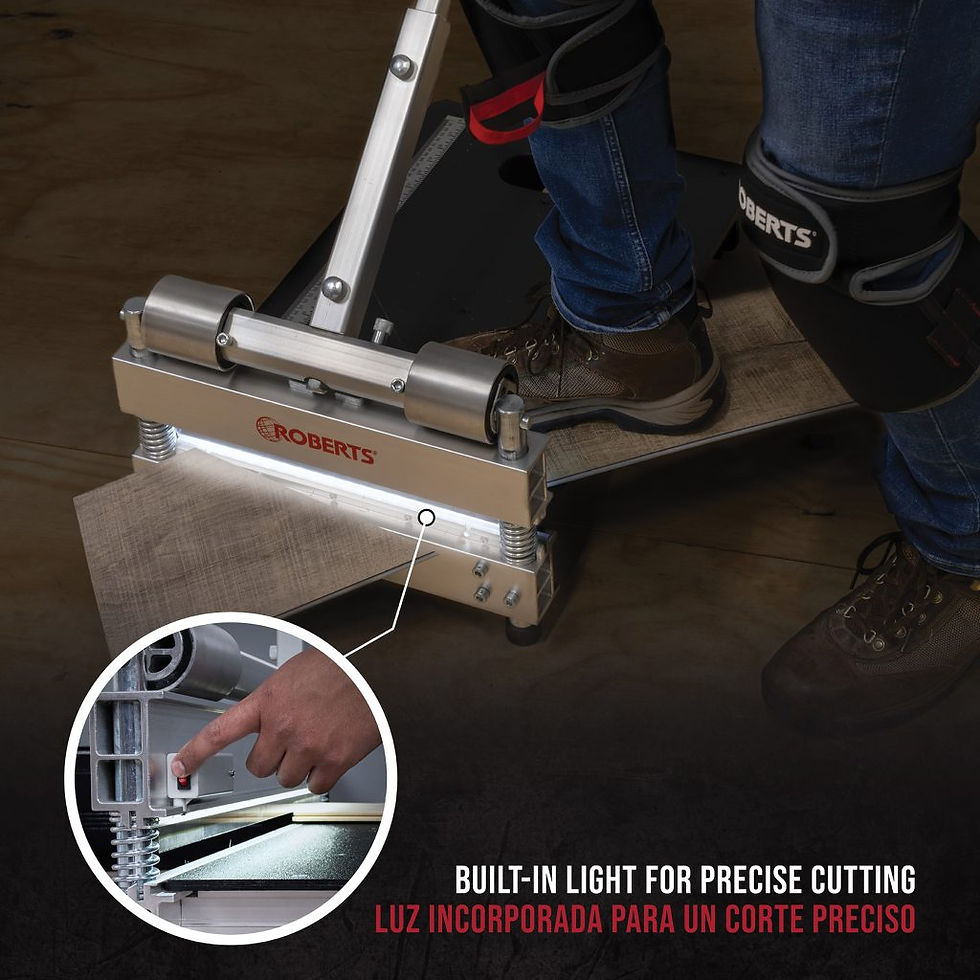
Cutting Saw
Choosing the right saw is crucial for cutting planks to size. A circular saw, a miter saw, or a laminate cutter can offer precise cuts. Select a tool that matches your comfort level and allows for accurate adjustments.
Additional Supplies
Adhesive
While floating hybrid floors do not require adhesive, installing hybrid flooring on stairs and the finishing trims like C Channels, will require glue. Check out our recommendation glue for the job.
Cleaner and Maintenance Supplies
Invest in a cleaner specifically designed for hybrid flooring. Regular maintenance with the right products can extend the lifespan of your floors and keep them looking fresh for years.
Wrapping It Up
Installing floating hybrid flooring is a fulfilling DIY project that can significantly enhance the style and functionality of your home. With the proper accessories and tools, you can achieve stunning results without hiring a contractor. From underlayment to cutting tools, having everything prepared sets you up for success. Remember to take your time and follow best practices for a flawless finish. Enjoy your flooring journey!
Comments